Page History
Ошибка
...
Error
When importing the test private key instead of the message about the successful import (Fig. 1) opens the Object already exists error (Fig. 2).
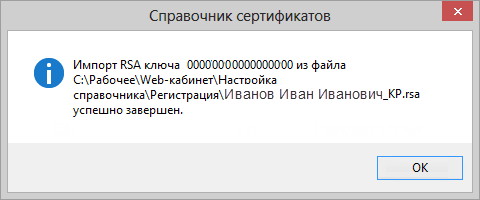
Рисунок 1 – успешное добавление справочника
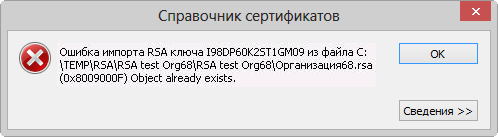
Рисунок 2 – пример ошибки
Варианты решения
Для решения данной проблемы необходимо
...
Fig. 1 – the successful adding of the test private key
Fig. 2 – example of the error
Ways of solving
To solve this problem you need:
- go to the certificates folder:
- for ОС Windows 7/Server2008 – C:\Users\User\AppData\Roaming\Microsoft\Crypto\RSA\;
- для for ОС Windows 8 – C:\Users\User\AppData\Roaming\Validata\rcs.
- удалить содержимое папки;
- добавить тестовый закрытый ключ согласно инструкции добавления тестового ключа (см. раздел Тестовые ключи, RSA)
Если данная ошибка открывается повторно, необходимо на адрес электронной почты support@itglobal.ru написать письмо, в котором следует указать шаги, выполнение которых приводит к появлению ошибки и ее скриншот. В ответ будет отправлено 2 файла:
исполняемый файл testcsp-x86 – утилита загрузки закрытого ключа в ПК Справочник сертификатов;
файл adding_key – командный сценарий, необходимый для запуска исполняемого файла.
Полученные файлы необходимо сохранить на компьютере в удобную для вас папку, затем выполнить следующее:
- разархивировать файл testcsp-x86.zip;
- перейти папку хранения сертификатов и удалить ее содержимое:для delete the contents of the folder;
- add test private key according to the instructions of adding a test key (see Test keys, RSA).
if the error persists, you should send a letter to the e-mail address support@itglobal.ru indicating the steps which leads to the appearance of the error and a screenshot of the error. In reply you will get 2 files:
executable file testcsp-x86 – utility for downloading the private key to the Certificate storage;
file adding_key – the command script for starting the executable file.
You will need to save the files to a folder on your computer, then perform the following steps:
- unzip the filetestcsp-x86.zip;
- go to the certificates folder and delete the contents of the folder:
- for ОС Windows 7/Server2008 – C:\Users\User\AppData\Roaming\Microsoft\Crypto\RSA\;
- для for ОС Windows 8 – C:\Users\AnnaUser\AppData\Roaming\Validata\rcs.
открыть файл open the file adding_keyчерез текстовый редактор. В результате откроется командный сценарий using the text editor. This will open a command script (рис. 3);
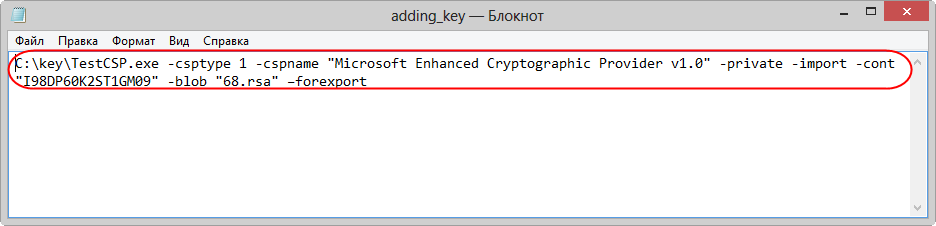
Рисунок 3 – сценарийFig. 3 – command script
указать параметры закрытого ключа в строке fill test private key parameters TestCSP.exe -csptype 1 -cspname "Microsoft Enhanced Cryptographic Provider v1.0" -private -import -cont "I98DP60K2ST1GM09" -blob "RsaFileName.rsa" –forexport:
путь Path (рисfig. 4,1) к файлу ключа (например to the executable file testcsp-x86 (eg,C:\key\TestCSP.exe);
cont (рисfig. 4,2) – идентификатор ключа key ID (напримерeg, I10DP60K00T1GM07);
blob (рисfig. 4,3) – имя файла с ключом (напримерkey file name (eg, RsaFileName.rsa).
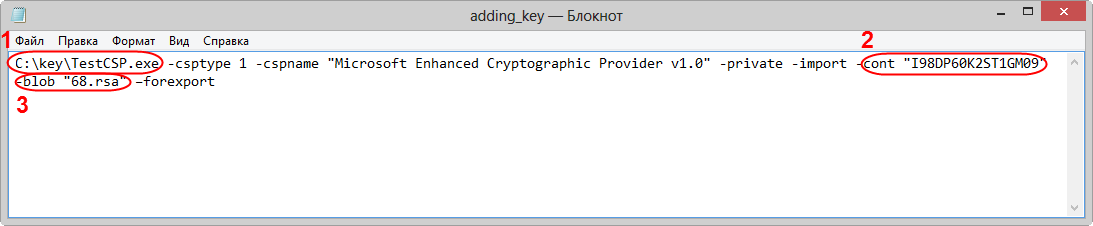
Рисунок 4 – параметры сертификата закрытого ключаInfo Идентификатор ключа следует уточнить у Московской Биржи.
- сохранить файл;
- запустить файл adding_key двойным нажатием. В результате будет запущена утилита testcsp-x86 для автоматического добавления закрытого ключа в справочник.
...
Fig. 4 – test private key parameters
Info The key ID you can check with the Moscow stock Exchange.
- save the file; open the source code file using a double click.
- run the file adding_key using a double click. As a result, the utility testcsp-x86 is automatically launched.
Next, you need to run Certificate storage and make sure that the key had been imported. Then the certificate must be set as default (see Adding a test keys, RSA).
Overview
Content Tools